
Copper Tech Construction Inc. was founded in May, 2000. This company offers custom copper decorating options for the interior and exterior of your home. We pride ourselves on high quality work, combined with the flexibility of creating something uniquely for you and your home. 801-979-4404 or 801-319-4404
Thursday, March 31, 2011
Monday, March 28, 2011
Sunday, March 27, 2011
How to Install Cork Flooring
How to Install Cork Flooring
Step 1: Apply the Skim Mortar
To get rid of any imperfections in the underlayment, apply skim mortar over the cracks in the floor and any other bumps.
Step 2: Sand the Floor
After the mortar dries, go over the flooring with a fine- to medium-grit sandpaper with an orbital sander.Step 3: Add a Dab of Thinset
Put a dab of thinset in random spots that you can sand within 30 minutes. Clean up all the dust when you're done.Step 4: Apply the Adhesive
Protect the finished surfaces with masking tape first. Put the water-based adhesive in a roller pan. Start in the corners with a paintbrush, and be sure to use a cheap, disposable brush. Lay on a nice even coat, not too thick and cover the entire floor with a thin coat of glue. Use a foamed roller for large areas. Wait from 30 minutes to an hour for the glue to dry.Tip: Work toward an open doorway so you don't get stuck in a corner.

Step 5: Set the Laser Beam
Get a starting point, and the object is to have as many full tiles in a visible area as possible. Once the first tile is down, all the other tiles will fall into place accordingly. Use a laser beam to make laying cork tiles a work of precision since it shoots perfect 45-degree angles from the floor. Set the laser beam at the starting point -- where the edge of the first full row of tiles should go. Check your work by measuring from the walls to the laser line. If the walls are off, make adjustments to the starting line.
Step 6: Lay the First Tile
Lay the first tile in the corner, gently pressing it into place.Tip: Be careful since adhesive is on the back of the tiles. It will be stuck for good once it's down on the adhesive and the floor.
Step 7: Overlap the Seams
Overlap the second piece at the seam of the first tile to stagger seams for a more professional look. You can move in a new direction by marking a tile at the midway point and setting the tile so it overlaps the seam evenly in both directions.
Step 8: Cut and Lay the Tiles
Take a measurement and transfer it to the cork. Make the cut using a utility knife and straightedge. Don't worry about fitting tiles perfectly under any cabinets. A toekick under the cabinets will cover the edges as will the baseboard along the wall. Continue until the cork flooring is down.
Step 9: Apply the Catalyst
Add a preset amount of catalyst to the urethane and stir for three minutes to activate the chemical. Pour a small amount on the floor. Use a synthetic fleece applicator, and go in one direction to avoid streaks.Tip: Hold the applicator like a snowplow, so liquid will be pushed away from the area you just did. And use slow, smooth strokes to avoid bubbles.

Step 10: Hand Sand the Floor
Let it dry for at least two hours before you apply a second coat. After a third coat of sealer, hand sand the floor with a fine grit before a fourth and final coat is applied.
Step 11: Install the Baseboard
Take a measurement first, and use a power miter saw to cut the baseboard so it fits into the corner. Nail the baseboard into the stud with a finish nailer. Putty the nail holes when you're done.Step 12: Cut Angled Corners
To cut the angled corners, cut a piece at a reverse 45-degree angle. Use a coping saw to trim away the inside of the board, but leave the contour of the molding.
Step 13: Install a Toekick
Measure the length of each cabinet and cut the toekick to size.Step 14: Create a Finished Edge
For an unfinished edge, use strips of wood veneer and measure a piece that's a little longer. Cut it with a utility knife and line up the edge with the finished grain of wood. Set an iron on medium heat to activate the hot-melt adhesive (it will harden almost immediately), and set the piece upside down. Trim off the excess with a utility knife.
Step 15: Apply the Shoe Molding
When nailing in the toekick, press it up against the cabinet since the shoe will hide any gaps against the floor. Apply the shoe.Garlic-Parmesan Popcorn
Garlic-Parmesan Popcorn


Yield: 20 cups
Cost per Serving: $.30
Cost per Serving: $.30
Ingredients
- 3 tablespoons unsalted butter
- 2 cloves garlic, minced
- 2 tablespoons vegetable oil
- 1 cup unpopped popcorn
- 1/2 cup finely grated Parmesan
- 1/2 teaspoon cayenne pepper
- Salt
Preparation
In a small saucepan over medium heat, melt butter. Add garlic and cook 1 minute, stirring, then remove saucepan from heat and set aside to cool slightly.Warm vegetable oil in a large, deep pot with a tight-fitting lid over high heat. When oil is hot, add unpopped popcorn, cover pot, and cook 1 minute. Vigorously slide pot back and forth over burner until popcorn begins to pop. Continue cooking and shaking pot until popping subsides, about 5 minutes. Remove pot from heat and transfer popcorn to large serving bowl.
Pour butter-garlic mixture over popcorn, sprinkle with Parmesan and cayenne and toss to coat. Season with salt and serve.
Nutritional Information
- Calories:
- 73
- Fat:
- 4g (sat 2g)
- Protein:
- 2g
- Carbohydrate:
- 7g
- Fiber:
- 1g
- Cholesterol:
- 7mg
- Sodium:
- 97mg
Lemon Pepper Shrimp Scampi
Lemon Pepper Shrimp Scampi


Photo: Randy Mayor; Styling: Jan Gautro
Indulge in the flavor of the Mediterranean with plump shrimp tossed with lemon and pepper. Serve with sautéed asparagus for a fine accompaniment.
Yield: 4 servings (serving size: 1/2 cup orzo mixture and about 7 shrimp)
Ingredients
- 1 cup uncooked orzo
- 2 tablespoons chopped fresh parsley
- 1/2 teaspoon salt, divided
- 7 teaspoons unsalted butter, divided
- 1 1/2 pounds peeled and deveined jumbo shrimp
- 2 teaspoons bottled minced garlic
- 2 tablespoons fresh lemon juice
- 1/4 teaspoon black pepper
Preparation
1. Cook orzo according to package directions, omitting salt and fat. Drain. Place orzo in a medium bowl. Stir in parsley and 1/4 teaspoon salt; cover and keep warm.2. While orzo cooks, melt 1 tablespoon butter in a large nonstick skillet over medium-high heat. Sprinkle shrimp with remaining 1/4 teaspoon salt. Add half of shrimp to pan; sauté 2 minutes or until almost done. Transfer shrimp to a plate. Melt 1 teaspoon butter in pan. Add remaining shrimp to pan; sauté 2 minutes or until almost done. Transfer to plate.
3. Melt remaining 1 tablespoon butter in pan. Add garlic to pan; cook 30 seconds, stirring constantly. Stir in shrimp, juice, and pepper; cook 1 minute or until shrimp are done.
Nutritional Information
- Calories:
- 403
- Fat:
- 10.4g (sat 4.8g,mono 2.2g,poly 1.4g)
- Protein:
- 40.1g
- Carbohydrate:
- 34.7g
- Fiber:
- 1.7g
- Cholesterol:
- 276mg
- Iron:
- 4.3mg
- Sodium:
- 549mg
- Calcium:
- 97mg
The Human Battery
The Human Battery
Here’s a fun project for young scientifically-minded students who enjoy a good experiment. This project was completed and submitted by a customer, Gannon Boyd, who emailed the details to our customer service department.

Batteries are simple devices that store chemical energy and convert it to electrical energy. A battery consists of one or more voltaic cells, in various sizes and forms and are integrated into most electronic and portable devices.
Required materials
• Copper Plate
• Aluminum Plate
• Micro Ammeter (a measuring instrument used to measure the electric current in a circuit, can be found at your local Radio Shack store)
• 2 Alligator Clips (a temporary electrical connector, named for its resemblance to an alligator’s jaws)
• Lead Wire
• 2 Blocks of Wood
• 1 Human Volunteer
If you have set up the “Human Battery” properly, when you place your hands on each plate, an electric current is generated and indicated on the micro ammeter. If the meter doesn’t move, it’s possible the connections are wrong or not secure. In the case of no readings, try cleaning the plates and reversing the connections. Also, make sure both the copper and aluminum plates are clean before using them. Dirty plates can interfere in the experiment and prevent accurate results.
Step-By-Step Procedure
1. Mount the copper plate and the aluminum plate to separate blocks of wood.
2. Connect one of the Micro Ammeter’s terminals to the copper plate and attach with a alligator clip.
3. Connect the other Micro Ammeter’s terminal to the aluminum plate and attach with a alligator clip.
4. Have the human volunteer stand between the two plates and hold each one in their hands.
SECOND VERSION
5. Follow steps 1-4, with one change to step 4.
6. Place both hands in water before touching the plates.
7. Once again, have a human volunteer touch both plates with their wet hands.
Placing your hands on the metal plates causes the effect of a battery charge. Your hands contain a thin film of sweat that produces a chemical reaction similar to battery acid when placed on the metal plates. Your hands take negatively charged electrons away from the copper plate and transfer them to the aluminum plate, causing it to be negatively charged. The variance in charges between the places produces an electrical current which flows through your body and displays on the meter.
Results For Second Version
In the version where the human’s hands are wet, the reading on the current meter is higher than when the hands are not wet. The human body resists the flow of current through the skin. When wet hands are placed on the plates, the resistance to current is decreased thus increasing the flow of current and creating a higher reading on the meter.
Cavatappi with Prosciutto and Parmesan
Cavatappi with Prosciutto and Parmesan

Randy Mayor
This simple pasta toss relies on a few well-chosen, high-quality ingredients. Ensure success with Italian imports: extravirgin olive oil; buttery imported prosciutto from Parma; and nutty, complex Parmigiano-Reggiano, also from Parma.
Yield: 4 servings (serving size: 1 cup pasta mixture and 1 tablespoon cheese)
Ingredients
- 1/2 pound uncooked cavatappi
- Cooking spray
- 1 garlic clove, minced
- 1 tablespoon finely chopped fresh parsley
- 2 tablespoons extravirgin olive oil
- 1/2 teaspoon salt
- 1/2 teaspoon freshly ground black pepper
- 1 ounce very thin slices prosciutto, cut into thin strips
- 1/4 cup (1 ounce) shaved fresh Parmigiano-Reggiano cheese
Preparation
Cook pasta according to the package directions, omitting salt and fat. Drain in a colander over a bowl, reserving 3 tablespoons cooking liquid.Heat pan over medium heat. Coat pan with cooking spray. Add garlic to pan, and sauté 1 minute. Remove from heat. Add reserved 3 tablespoons cooking liquid and pasta to pan; let stand 2 minutes. Stir in parsley, oil, salt, pepper, and prosciutto; sprinkle with cheese. Serve immediately.
Nutritional Information
- Calories:
- 313 (30% from fat)
- Fat:
- 10.4g (sat 2.7g,mono 5.6g,poly 0.8g)
- Protein:
- 12.4g
- Carbohydrate:
- 43g
- Fiber:
- 1.9g
- Cholesterol:
- 11mg
- Iron:
- 2.1mg
- Sodium:
- 555mg
- Calcium:
- 103mg
Simple, Safe Patinas From Your Kitchen Cabinet
By Frank Ross
 Patinas are a beautiful part of the copper experience, and while time is the most natural way to achieve a nice patina most people do not want to wait several years for a particular effect to slowly form. Also, a natural patina depends on the ambient chemicals present in the air the copper is exposed to, and that determines the patina coloration. The alternative to waiting and accepting luck-of-the-draw coloration is a chemical application which produces the desired result very quickly. The downside is the exposure to toxic materials that can pose serious health threats, and then the cleanup and disposal of the residue. As discussed in my previous article, Creating Patinas on Copper and Bronze, a wide variety of commercially prepared formulas are available based on the color you desire to achieve. Most, if not all of them, are quite caustic so if you’re looking for a safer option, try using some of the solutions you already have in your home.
Normally I would put the legal disclaimers at the end of an article, but the title of this piece warrants an upfront notice that simple and safe are two relative terms. While simple can be argued from an age or ability standpoint, “safe” is the term that is more of a concern to me. When statements are made that involve the term “safe” people can have a false sense of security. Even mild acids can be painful and harmful in the eyes, and when dealing with sprays there is always the potential for misted liquids to become airborne and land where they were not intended. When using a spray bottle to apply liquids on copper consider the wind direction and always hold the material downwind. Also, before you begin any application you should know what the neutralizer is for any acid you intend to use and have it handy just in case it is needed quickly. Even mild acids can be quite painful. You will want to see the results of your efforts, so always wear safety goggles to protect your eyes and rubber gloves to protect your hands. It is also a good idea to wear old clothes that you won’t mind spoiling.
Now that you’ve got your copper prepared it’s time to say that creating copper patinas is more of an art than a science. Results will vary, sometimes dramatically, so proceed with an open mind.
The first step to any patina project is preparing the metal, and cleaning off the residue of milling, handling and environmental collectives can be handled with a simple washing of dish soap and hot water may be adequate. For more fouled surfaces cleaners that contain trisodium phosphate are more effective, but also more offensive to skin. Avoid cleaners which leave a coat of oxide on the copper surface. You’ll know if the cleaning process has been done properly if you wash the copper off after cleaning and the water sheets uniformly and does not form beads. Beading indicates the presence of oils or contaminates and additional cleaning will be required.
Salt, or sodium chloride, when combined with acetic acid from the vinegar produces sodium acetate and hydrogen chloride. Hydrogen chloride is a strong acid and the combination of it and sodium acetate will quickly clean a copper surface. This cleaning process will give your metal a very pure surface, which will corrode quickly when exposed to water and the combination of oxygen and carbon dioxide in the air.
Small pieces of copper can be sprayed with vinegar, sprinkled with salt and put in a sealed plastic or glass container with a dish of cloudy ammonia overnight. The following day, rinse the mixture off and let it dry. The results should be a blue patina on a dark background. You can also embed pieces of copper in sawdust that has been dampened with vinegar. This gives an interesting effect but less colorful.
Another option for a green patina is to mix 1 Tbsp ammonium chloride (Sal ammoniac) with 1 Tbsp salt and 1 ounce of ammonia in a spray bottle with 1 quart of bottled or distilled water. Warm or hot water will help dissolve the dry ingredients more quickly. Spray it on a clean copper surface and let stand for three hours for a nice green color. Repeat several times for increased coloration. Sal ammoniac is not something that you’d normally have in your everyday kitchen, but in the spirit of “safe” chemicals I’m throwing this one in the mix. Although the kitchen aspect of this chemical is rapidly dying due to the general disuse of it as an ingredient, in the past, sal ammoniac has been used by bakers to give cookies a crisp texture. If you don’t use it in your favorite cookie recipe, it is available online from a number of sources.
Another blue-green patina can be achieved by placing a piece of copper in a glass or plastic container and covering it with sawdust saturated with ammonia liberally mixed with salt. In an hour or so you’ll begin to see a nice speckled blue-green surface. Varying the mixture and the density of the sawdust will alter the results, perhaps more to your liking.
Muriatic acid will also produce a pretty blue-green color if diluted, then sprayed on and left over night. You can pick up muriatic acid at your local hardware store. Just remember that muriatic is actually a 20% solution of hydrochloric acid so be very careful that you have adequate ventilation and the safety precautions I covered earlier.
Other colors can be obtained with preparations such as gun bluing chemicals which can produce either a blue or brown effect. Another option for brown coloration would be uric acid, which has used to apply patinas on copper and its alloys brass and brass. The most common source is cow urine. The break-down or the ammonia cycle seals and purifies the rich, brown coloration.
I’m sure there are other chemicals and combinations of chemicals that you will want to try, once you become bitten by the patina bug. These are but a few that are simple, relatively safe, and most readily available for experimentation. The most important part of the process is to do it. Get some copper, create something, and add a patina to the finish. It’s fun, it’s creative, and it’s copper!
Important note
In my experience of doing the chemical treatments on copper like the writer said, make sure you have adequate ventilation and if you choose to lighten your work it is best if the item is wet when you do it. When done dry the powder will get in your system and can cause health issues later.
Greg Nielsen
Copper Tech Construction, Inc.

A piece of hammered copper with a muratic acid patina is contrasted with a sheet of decorative copper that has not been treated.
Normally I would put the legal disclaimers at the end of an article, but the title of this piece warrants an upfront notice that simple and safe are two relative terms. While simple can be argued from an age or ability standpoint, “safe” is the term that is more of a concern to me. When statements are made that involve the term “safe” people can have a false sense of security. Even mild acids can be painful and harmful in the eyes, and when dealing with sprays there is always the potential for misted liquids to become airborne and land where they were not intended. When using a spray bottle to apply liquids on copper consider the wind direction and always hold the material downwind. Also, before you begin any application you should know what the neutralizer is for any acid you intend to use and have it handy just in case it is needed quickly. Even mild acids can be quite painful. You will want to see the results of your efforts, so always wear safety goggles to protect your eyes and rubber gloves to protect your hands. It is also a good idea to wear old clothes that you won’t mind spoiling.
Now that you’ve got your copper prepared it’s time to say that creating copper patinas is more of an art than a science. Results will vary, sometimes dramatically, so proceed with an open mind.
The first step to any patina project is preparing the metal, and cleaning off the residue of milling, handling and environmental collectives can be handled with a simple washing of dish soap and hot water may be adequate. For more fouled surfaces cleaners that contain trisodium phosphate are more effective, but also more offensive to skin. Avoid cleaners which leave a coat of oxide on the copper surface. You’ll know if the cleaning process has been done properly if you wash the copper off after cleaning and the water sheets uniformly and does not form beads. Beading indicates the presence of oils or contaminates and additional cleaning will be required.
Salt, or sodium chloride, when combined with acetic acid from the vinegar produces sodium acetate and hydrogen chloride. Hydrogen chloride is a strong acid and the combination of it and sodium acetate will quickly clean a copper surface. This cleaning process will give your metal a very pure surface, which will corrode quickly when exposed to water and the combination of oxygen and carbon dioxide in the air.
Small pieces of copper can be sprayed with vinegar, sprinkled with salt and put in a sealed plastic or glass container with a dish of cloudy ammonia overnight. The following day, rinse the mixture off and let it dry. The results should be a blue patina on a dark background. You can also embed pieces of copper in sawdust that has been dampened with vinegar. This gives an interesting effect but less colorful.
Another option for a green patina is to mix 1 Tbsp ammonium chloride (Sal ammoniac) with 1 Tbsp salt and 1 ounce of ammonia in a spray bottle with 1 quart of bottled or distilled water. Warm or hot water will help dissolve the dry ingredients more quickly. Spray it on a clean copper surface and let stand for three hours for a nice green color. Repeat several times for increased coloration. Sal ammoniac is not something that you’d normally have in your everyday kitchen, but in the spirit of “safe” chemicals I’m throwing this one in the mix. Although the kitchen aspect of this chemical is rapidly dying due to the general disuse of it as an ingredient, in the past, sal ammoniac has been used by bakers to give cookies a crisp texture. If you don’t use it in your favorite cookie recipe, it is available online from a number of sources.
Another blue-green patina can be achieved by placing a piece of copper in a glass or plastic container and covering it with sawdust saturated with ammonia liberally mixed with salt. In an hour or so you’ll begin to see a nice speckled blue-green surface. Varying the mixture and the density of the sawdust will alter the results, perhaps more to your liking.
Muriatic acid will also produce a pretty blue-green color if diluted, then sprayed on and left over night. You can pick up muriatic acid at your local hardware store. Just remember that muriatic is actually a 20% solution of hydrochloric acid so be very careful that you have adequate ventilation and the safety precautions I covered earlier.
Other colors can be obtained with preparations such as gun bluing chemicals which can produce either a blue or brown effect. Another option for brown coloration would be uric acid, which has used to apply patinas on copper and its alloys brass and brass. The most common source is cow urine. The break-down or the ammonia cycle seals and purifies the rich, brown coloration.
I’m sure there are other chemicals and combinations of chemicals that you will want to try, once you become bitten by the patina bug. These are but a few that are simple, relatively safe, and most readily available for experimentation. The most important part of the process is to do it. Get some copper, create something, and add a patina to the finish. It’s fun, it’s creative, and it’s copper!
Important note
In my experience of doing the chemical treatments on copper like the writer said, make sure you have adequate ventilation and if you choose to lighten your work it is best if the item is wet when you do it. When done dry the powder will get in your system and can cause health issues later.
Greg Nielsen
Copper Tech Construction, Inc.
Beef Stroganoff
Beef Stroganoff


- Rate the Recipe
- Read Reviews (0)
Always a family favorite, this classic dish of quickly sauteed beef and onion in a creamy mushroom sauce is perfect over hot cooked noodles. Garnish with fresh parsley for a colorful table presence and serve with a family favorite green vegetable.
Yield: 4 servings
Ingredients
- 1 tablespoon vegetable oil
- 1 pound boneless beef sirloin steak or beef top round steak, 3/4-inch thick, cut into thin strips
- 1 medium onion, chopped (about 1/2 cup)
- 1 can (10 3/4 ounces) Campbell's® Condensed Cream of Mushroom Soup (Regular, 98% Fat Free, 25% Less Sodium or Healthy Request®)
- 1 teaspoon paprika
- 1/3 cup sour cream or plain yogurt
- 1/2 of a 12-ounce package whole wheat or regular egg noodles (about 4 cups), cooked and drained
- Chopped fresh parsley
Preparation
Heat the oil in a 12-inch nonstick skillet over medium-high heat. Add the beef and cook until it's well browned, stirring often. Remove the beef from the skillet. Pour off any fat.Reduce the heat to medium. Add the onion to the skillet and cook until it's tender.
Stir the soup and paprika in the skillet and heat to a boil. Stir in the sour cream. Return the beef to the skillet and cook until the mixture is hot and bubbling. Serve the beef mixture over the noodles. Sprinkle with the parsley.
Serving Suggestion: Serve with sauteed spinach with garlic and crusty French bread. For dessert serve a fresh apple & raisin cup: cubed, cored apples mixed with raisins.
Cost per recipe: $8.33 Cost per recipe serving: $2.08Total cost of meal (including serving suggestion): $15.00 Cost calculations based on July 2008 national average prices
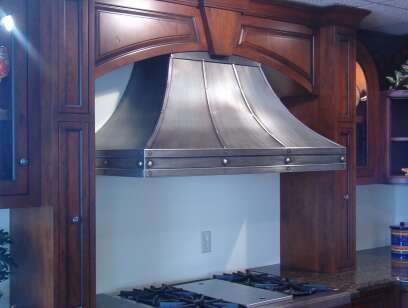
Food tastes much better cooked under a beautiful Range Hood.
Chicken Breasts with Mushroom Sauce
Chicken Breasts with Mushroom Sauce

Photo: Becky Luigart-Stayner; Styling: Leigh Ann Ross
Butter and whipping cream add a wonderful lushness to this savory pan gravy, which features fresh morel and button mushrooms.
Yield: 6 servings
Ingredients
- 6 (6-ounce) skinless, boneless chicken breast halves
- 3 tablespoons butter, divided
- 1/2 teaspoon salt
- 1/4 teaspoon freshly ground black pepper
- 4 ounces morel mushrooms
- 4 ounces button mushrooms, thinly sliced
- 2 cups fat-free, less-sodium chicken broth
- 1/4 cup whipping cream
- 4 1/2 cups hot cooked egg noodles
- Fresh flat-leaf parsley sprigs (optional)
Preparation
1. Place each chicken breast half between 2 sheets of heavy-duty plastic wrap; flatten to 1/4-inch thickness using a meat mallet or small heavy skillet. Heat 2 teaspoons butter in a large nonstick skillet over medium heat. Sprinkle chicken evenly with salt and pepper. Add 2 breast halves to pan, and cook for 3 minutes on each side or until done. Repeat procedure twice with 4 teaspoons butter and remaining chicken. Keep warm.2. Melt remaining 1 tablespoon butter in pan over medium-high heat. Add mushrooms to pan; sauté 5 minutes or until moisture evaporates, stirring frequently. Remove mushroom mixture from pan. Add broth to pan; bring to a boil, scraping pan to loosen browned bits. Cook until reduced to 1 cup (about 5 minutes). Return mushroom mixture to pan. Stir in cream; cook 2 minutes or until slightly thick, stirring occasionally.
3. Place 3/4 cup egg noodles on each of 6 plates. Cut each chicken breast half into 1-inch-thick strips. Top each serving with 1 chicken breast half and about 1/3 cup mushroom mixture. Garnish each serving with parsley sprigs, if desired.
Nutritional Information
- Calories:
- 452
- Fat:
- 14.2g (sat 7g,mono 3.8g,poly 1.6g)
- Protein:
- 47g
- Carbohydrate:
- 32.2g
- Fiber:
- 2.2g
- Cholesterol:
- 162mg
- Iron:
- 3.4mg
- Sodium:
- 489mg
- Calcium:
- 49mg
Occupancy Sensing Light Switch – So Worth It!
Occupancy Sensing Light Switch – So Worth It!
By Trish Holder"Mom!" he said. "Did you know this light comes on by itself when you walk in here?"
"Why, yes I do," I said.
"I like that!" he declared.
We won this little gadget while attending a green homes tour back in the spring of 2010. We just recently got around to installing it. It took my husband approximately 2 hours to install the switch, a process that was prolonged because he had trouble finding and fishing out a 4th wire that was needed to complete the connection. Other than that, it was a really easy installation.
We debated about where to install the switch, finally settling on the laundry room because it is a small room and there would be no obstructions between the sensor and whoever may be in the room. Even the cats trigger the light when they enter to do their business.
The laundry room turned out to be a good choice for a few reasons. Consider the fact that one's hands are frequently full upon entering or exiting a laundry room, making it awkward to turn a light switch on or off. One is tempted to leave such lights on, especially on laundry day, but that is hardly an efficient lighting solution.
A Matter of Convenience
I have no idea how much electricity this sensor actually saves - but I will say that it has been a welcomed convenience in our home. It occurred to me that automatic lighting would be great in a few other key spots as well:
Attic or Eave Storage. Again, your hands are almost always full when entering or exiting these spaces, so an occupancy sensing light switch would be nice to have. Plus, you never have to worry about a light staying on indefinitely in rooms you may only enter once or twice a month - if that much.
Entry Vestibules. We have a small hallway between the garage entry and the primary spaces in our home. If it's dark outside, this space is also dark, and struggling to find the light switch with an armful of groceries is a pain; to some degree it is even a safety issue. I'd really like to have one here.
Kids' Rooms (Maybe). I like to think that my kids will eventually learn to turn the lights off when they leave a room but unfortunately that glorious day hasn't arrived. I haven't given up on nagging (yet), as I don't want technology and convenience to take precedence over learning responsibility. Still, it is frustrating to go upstairs hours after the kids have left for school and find all the bedroom lights burning.
These sensors range in price from about $30.00 to $75.00, depending on the extra features (i.e. dimming capability, etc.) you have. They are available for all types of light bulbs, including incandescent, CFLs, and LEDs. For certain spaces in the home, I believe the price is worth the convenience alone. This is one of those rare instances where an added convenience actually saves energy.
Visualize Your Compelling Desire
Visualize Your Compelling Desire
 I know we’ve all heard this many times. Visualize the life you desire, take action on that and it will come to be. Do you believe it? You should because it’s been proven over and over again. It isn’t some crazy woo woo, out there concept.
 Athletes utilize this technique all the time. They visualize their actions in a race or a game over and over again long before they actually do it. This conditioning of your subconscious mind brings about results. The results are based on the level of your belief and desire to succeed.
Since your subconscious does not know the difference between reality or imagined, you can create a shift in your mind through this conditioning technique. If you believe in what you want to achieve, it is possible to build that belief in your mind until it becomes reality.
Visualize Your Compelling DesireCreate a compelling desire to accomplish this. Visualize your life the way you want it to be. Think of how you are living your life, what you’re doing, what you are able to be because of this. Take this all and create a picture of that life. Now, one key point here. Make sure as you do this, you visualize it as if it’s your reality right now. Don’t think of someday when… Think of it as if it’s truly what you have in your life at this moment.
Play that over and over again in your mind, attaching as much emotion and feeling to it as you can. Develop a ritual of doing this twice a day at the minimum. Right before you go to sleep or just after waking up is the best time to play this mind movie of your life. This is when your mind is most receptive to the auto suggestion.
Turning Action into ResultsBecause your subconscious mind is working to bring your visualization to reality, opportunities will be presented to you. Be aware of opportunities as they appear. It’s up to you to take action on these. If your compelling desire is strong enough, the action you take will bring about positive results.
These positive results will bolster your belief in yourself. As your belief strengthens and grows, it creates a more compelling desire to succeed. Building on your compelling desire will encourage you to take more action towards your vision. The positive results from this action will build your belief and compelling desire, and so on and so on…
As you can imagine, this is a never-ending circle that can propel you forward towards your dream. Repeating these steps over and over again creates and sustains your momentum to succeed. Can you visualize the synergy of this repeating pattern?
Are you ready to visualize your compelling desire? Are you ready to begin taking action towards that dream? There really isn’t a good reason not to, is there? Let’s see where this takes you. Visualize the end result, create a compelling desire to achieve that, take action towards that vision and build your belief in yourself. Keep repeating this as you step into your vision of your life.
Val Wilcox is a Speaker, Author and Life Coach who specializes in Empowering Your Life’s Dreams. Her passion lies in helping people discover their Dreams and navigate the transitions of Life’s interesting challenges. Success has many faces and looks different to each and every one of us. Discovering your Life’s Dreams unlocks the key to a better life. With more than 10 years of experience in Personal Leadership Development Training, Val brings a wealth of practical knowledge and experience to her coaching.
Val’s gift today is an EBook designed to start you on your journey of discovery. It’s called Change Your Mindset…Change Your Life. Is Your Life Everything You Thought It Should Be? Discover The Secrets To Creating A Spectacular Life. Learn How Simple Changes To Your Thought Patterns Can Empower You. Live a Life Filled With Endless Possibilities. Visit Val Wilcox.com – Empower Your Life at: http://www.valwilcox.com today.
Storage Trunks
Storage Trunks
A storage trunk not only adds much needed space for extra blankets, throws and pillows, but it can also make an excellent accent piece in your bedroom. Try placing a trunk at the foot of your bed. Not only does it make for plenty of storage space, but it also gives you a place to sit while putting on your shoes. Also, a bench with storage can perform the same function; it also looks great placed under a window or in an unused corner.

Captain Moroni & The Title of Liberty
And now it came to pass that when Moroni, who was the chief commander of the armies of the Nephites, had heard of these dissensions, he was angry with Amalickiah. And it came to pass that he rent his coat; and he took a piece thereof, and wrote upon it,

“In memory of our God,And he fastened it upon the end of a pole.
our religion,
and freedom,
and our peace,
our wives,
and our children”
Spring a Renovation On Your Home
Without any warning spring has burst upon the world. Daffodils vie with snowdrops and crocuses in a riotous carpet whilst soft apple and cherry blossom fill the skies. One of the benefits of a hard winter is that instead of creeping in one step at a time, spring arrives in a blaze of blossom and fills our hearts with joy.
Traditionally, this is the time for cupboards to be eviscerated and cushions to be shaken in an orgy of spring cleaning but when spring bursts on us as it has this year, for many the call goes deeper and we look to renovate our homes. Renovation can cover everything from a lick of paint to gutting the interior and starting again but traditionally renovation means rescuing your home from the shabbiness that has crept in through years of wear.
We'll start with a word of warning. Whilst it is easy to believe that the crack in the plaster or the slightly larger gap than expected beside an airbrick are as a result of materials breaking down with age, it is best to get a second opinion. Calling in a building surveyor doesn't cost the earth and they will swiftly be able to put your mind at rest or to suggest urgent repairs to prevent your home falling down. Either way you will then be able to get on with the renovation.
Starting with ceilings, they can crack and flake due to movement in upstairs rooms. Often a quick plaster skim will be all that is needed to restore a ceiling to its former glory. Occasionally your builder or surveyor may suggest replacing a particularly damaged section. Those with older homes should definitely take expert advice at this stage as some older ceilings contain asbestos.
Renovating walls could be as simple as redecorating but if plaster is flaking or separating then some remedial work may be required. An expert plasterer or builder will soon be able to advise on this. Tiled walls might benefit from a re-grout or a really good clean but here again if the tiles are separating from the wall then more drastic action is needed.
When it comes to floors, renovation might involve relaying wooden or tiled floors, adding underfloor heating or simply stripping off layers of grime and re-polishing. If you are taking up floors have a think about whether you want to rewire or change the route of any pipes before laying the new floor.
Taking the plunge and calling in a surveyor or interior decorator to help you to renovate can be daunting as you don't know what you might find when you start looking. Once done, your home will feel fresh and new just in time to face the lazy days of summer.
Tough Love For The Starry-Eyed Homeowner In Us All
Tough Love For The Starry-Eyed Homeowner In Us All
By Trish Holder
Remember that scene in Moonstruck where Cher slaps Nicholas Cage across his face and yells, 'Snap out of it!'? Well, there's a lesson in that for us all, particularly when it comes to home ownership.
Here's some tough love to all those drunk with excitement over the prospect of their new home or newly renovated kitchen. It doesn't matter how great a guy (or gal) your builder or contractor is, the second your job is complete, the memory of you and the money you spent starts to fade very quickly. You'll notice that he doesn't return your calls as promptly as before. He may not return them at all if he thinks trouble lies at the other end of that call.
And there you are, staring at a stain on your ceiling that appears to be some sort of.....leak.
When Bad Things Happen to Good Homeowners
 What happens, if your contractor goes belly-up right after he finishes installing your new roof, which, you subsequently discover has a leak due to improper installation? Who ya gonna call then? Ghostbusters?
 No. In all likelihood you've got a big dogfight on your hands if you ever hope to hold that contractor accountable. If you enjoy the fight - go for it! You've got a case and you just might win, but it won't happen overnight and no one's paying you for the time you spend fighting the good fight. You should also know lawyers aren't exactly standing in line to help you win a case against a guy that doesn't have that much money anyway. You could always file a complaint to the licensing board. Oh, wait. He doesn't have a license anymore, or need one for that matter, because now he's joined an Alaskan fishing crew in hopes of landing a role on Deadliest Catch.
The fact is, there isn't much in place in the residential building industry to protect homeowners from contractor error or negligence. And, there are all sorts of ways a contractor can wiggle out of responsibility once those mistakes are discovered.
Homeowner education and preparedness are the best defense against these types situations. In this day and age, there's no reason to repeat the mistakes others have made, not when it comes to home construction. The Internet offers a vast library of research material. (Okay - so not all of it is as fun to read as what you'll find here at Greenspiration Home, but there is a lot of good information that will save you time and money.)
Homeowners educating other homeowners is what Greenspiration Home is all about. So, please, share your experiences with us. Every homeowner in the world has at least one precious bit advice that could save us all time, money, and tears. Let us tell your story.
|


Good & Green at the NAHB International Builders Show Part 1: A Kitchen Faucet that Really Saves Water
Good & Green at the NAHB International Builders Show
Part 1: A Kitchen Faucet that Really Saves Water
By Trish Holder 
I recently returned from two days at the 2011 NAHB International Builders' Show (IBS) in Orlando, Florida. For those of you who aren't aware, this is a HUGE show featuring just about anything that goes into building and outfitting a home. Even at 1/3 of its usual size (thanks to the lousy economy), the show was still impossible to cover in the two days I had. So, I spent my time carefully. I did my research beforehand and only went to the booths that really interested me. I saw a lot of cool stuff, but I was super-impressed with just a few things that I will share with you over the next few blogs, starting with this one.
You Can Save Water in The Kitchen!
If you read my recent blog on water saving fixtures, then you know that I don't think low flow fixtures really minimize water waste in the kitchen because it is typically a volume-based point-of-use. You're going to use the amount of water you need - end of story. But, Delta Faucet introduced me to one type of kitchen fixture that I believe really will save water. It's not a low flow fixture - rather it is a hands-free device that turns the water off and on with just a touch anywhere on the faucet body or handle. It is "hands-free" because you can turn it off and on with the back of your wrist, your elbow, or even a gentle kiss if you are so inclined.
Why does this save water? Think about it. If you are preparing food, washing food, etc. it is often very inconvenient (and sometimes unsanitary) to continuously reach for the faucet handle between each short interval of use. So what do most of us do? We leave the water running while we run through our task. Touch2O® Technology makes turning the water off and on much more convenient - and clean. A quick tap is all it takes to keep water from running when you don't need it or turn it back on when you do. To me, this makes a lot more sense than a faucet with a built-in aerator.
I do believe the key to saving water in the kitchen is not the amount of flow that comes out of the fixture, but minimizing those times when we leave the water on out of sheer convenience. I've probably wasted thousands of gallons of water washing romaine lettuce - and my family doesn't even eat that much salad!

Subscribe to:
Comments (Atom)